# Optional
传统的写代码方式经常会遇到NullPointerException,这就需要我们在代码中经常判空。而判空的写法又会显得很累赘,这里就可以用到Optional来简化代码。
- Optional是在java.util包下的一个用于代替null的一个工具类
- Optional 是个容器:它可以保存类型T的值,或者仅仅保存null
- Optional 类是一个可以为null的容器对象。如果值存在则isPresent()方法会返回true,调用get()方法会返回该对象
Optional 类的引入很好的解决空指针异常的问题
# 实现可选参数的功能
javaCopy codepublic void myMethod(int a, Optional<Integer> b) {
    int value = b.orElse(10); // 使用默认值 10,如果提供了参数 b,则使用提供的值
    // 使用参数 a 和 value 进行处理逻辑
}
# 构建Optional对象
- 创建一个空的 Optional 实例
Optional<String> emptyOptional = Optional.empty();
- 创建一个 Optional 实例,当 t为null时,抛出NullPointerException异常
Optional<String> notNullOptional = Optional.of("aaa");
- 创建一个 Optional 实例,但当 t为null时不会抛出异常,而是返回一个空的实例
Optional<String> notNullOptional = Optional.ofNullable("aaa");
# 相关方法使用
- isPresent():持有非空值,返回true;否则false;
Optional optional = Optional.ofNullable(null);
Optional optional1 = Optional.of("");
Optional optional2 = Optional.empty();
System.out.println(optional.isPresent()); //fasle
System.out.println(optional1.isPresent()); //true
System.out.println(optional2.isPresent());  //false
- ifPresent():如果 Optional 中有值,返回该值,否则什么也不做
Optional<String> optional = Optional.of("Hello optional");
System.out.println("optional get is :"+optional.get());
optional.ifPresent(System.out::println);
- orElse:参数是一个值,如果 Optional 中有值则将其返回,否则返回 orElse 方法传入的参数
//Optional 中有值
Optional optional = Optional.ofNullable("fdgshsgf");
System.out.println(optional.orElse("reiwgybv"));
- orElseGet:功能与orElse一样,只不过orElseGet参数是一个对象
optional.orElseGet(() -> "Default Value")
- orElseThrow:如果optional不为空,则返回optional中的对象;如果为null,则抛出Supplier函数生成的异常
String bb = optional.orElseThrow(() -> new Exception("抛出异常"));
- map:为空返回Optional.empty,否则返回一个新的Optional,函数mapper在以value作为输入时的输出值可以多次使用map操作
Optional<String> username = Optional.ofNullable(getUserById(id))
		.map(user -> user.getUsername())
		.map(name -> name.replace('_', ' '));

System.out.println("Username is: " + username.orElse("Unknown"));
- flatMap:map 方法参数中的函数 mapper 输出的是值,然后 map 方法会使用 Optional.ofNullable 将其包装为 Optional;而 flatMap 要求参数中的函数 mapper 输出的就是 Optional
Optional<String> username = Optional.ofNullable(getUserById(id))
		.flatMap(user -> Optional.of(user.getUsername()))
		.flatMap(name -> Optional.of(name.toLowerCase()));

System.out.println("Username is: " + username.orElse("Unknown"));
- filter:如果有值并且满足条件,就返回该Optional,否则返回空Optional
Optional<User> result = Optional.ofNullable(user).filter(u -> u.getEmail().contains("@"));
# SPI 机制
SPI 全称为 Service Provider Interface,是一种服务发现机制
# SPI 的本质是将接口实现类的全限定名配置在文件中,并由服务加载器读取配置文件,加载实现类
# 这样可以在运行时,动态为接口替换实现类
# 示例代码
// 定义一个接口,名称为 Robot
public interface Robot {
    void sayHello();
}

// 定义两个实现类,分别为 OptimusPrime 和 Bumblebee
public class OptimusPrime implements Robot {
    @Override
    public void sayHello() {
        System.out.println("Hello, I am Optimus Prime.");
    }
}

public class Bumblebee implements Robot {
    @Override
    public void sayHello() {
        System.out.println("Hello, I am Bumblebee.");
    }
}
# Java SPI 示例
在 META-INF/services 文件夹下创建一个文件,名称为 Robot 的全限定名 org.apache.spi.Robot。文件内容为实现类的全限定的类名,如下:
org.apache.spi.OptimusPrime
org.apache.spi.Bumblebee
编写代码进行测试:
public class JavaSPITest {
    @Test
    public void sayHello() throws Exception {
		// 使用 SPI 来获取驱动的实现类
        ServiceLoader<Robot> serviceLoader = ServiceLoader.load(Robot.class);
        System.out.println("Java SPI");
        // 1. forEach 模式
        serviceLoader.forEach(Robot::sayHello);
        // 2. 迭代器模式
        Iterator<Robot> iterator = serviceLoader.iterator();
        while (iterator.hasNext()) {
            Robot robot = iterator.next();
       	    robot.sayHello();
        }
		// 输出
		// Java SPI
		// Hello, I am Optimus Prime.
		// Hello, I am Bumblebee.
    }
}
# Spring SPI 机制
在资源文件目录,创建一个固定的文件 META-INF/spring.factories
#key是接口的全限定名,value是接口的实现类
org.apache.spi.Robot = org.apache.spi.OptimusPrime,org.apache.spi.Bumblebee
运行代码:
// 调用 SpringFactoriesLoader.loadFactories 方法加载 Robot 接口所有实现类的实例
List<Robot> myTestServices = SpringFactoriesLoader.loadFactories(
            Robot.class,
            Thread.currentThread().getContextClassLoader()
);

for (Robot testService : myTestServices) {
     testService.sayHello();
}
注意
和 Java SPI 一样,Spring SPI 也无法获取某个固定的实现,只能按顺序获取所有实现
# MapStruct
随着微服务和分布式应用程序迅速占领开发领域,数据完整性和安全性比以往任何时候都更加重要。在这些松散耦合的系统之间,安全的通信渠道和有限的数据传输是最重要的。大多数时候,终端用户或服务不需要访问模型中的全部数据,而只需要访问某些特定的部分。
数据传输对象(Data Transfer Objects, DTO)经常被用于这些应用中。DTO只是持有另一个对象中被请求的信息的对象。通常情况下,这些信息是有限的一部分。例如,在持久化层定义的实体和发往客户端的DTO之间经常会出现相互之间的转换。由于DTO是原始对象的反映,因此这些类之间的映射器在转换过程中扮演着关键角色。
这就是MapStruct解决的问题:手动创建bean映射器非常耗时。 但是该库可以自动生成Bean映射器类。
# 简单使用
- 引入依赖,注意:当lombok和mapstruct一起用的时候,会导致mapstruct失效
<dependency>
	<groupId>org.mapstruct</groupId>
	<artifactId>mapstruct</artifactId>
	<version>1.5.3.Final</version>
</dependency>
<dependency>
	<groupId>org.projectlombok</groupId>
	<artifactId>lombok</artifactId>
	<version> 1.18.28</version>
</dependency>

<!--MapStruct在编译时工作,并且会集成到像Maven和Gradle这样的构建工具上-->
<!--所以必须在添加插件maven-compiler-plugin-->
<plugins>
	<plugin>
		<groupId>org.apache.maven.plugins</groupId>
		<artifactId>maven-compiler-plugin</artifactId>
		<version>3.10.1</version>
		<configuration>
			<source>1.8</source>
			<target>1.8</target>
			<!--注意lombok和mapstruct的顺序-->
			<annotationProcessorPaths>
				<path>
					<groupId>org.projectlombok</groupId>
					<artifactId>lombok</artifactId>
					<version> 1.18.28</version>
				</path>
				<path>
					<groupId>org.mapstruct</groupId>
					<artifactId>mapstruct-processor</artifactId>
					<version>1.5.3.Final</version>
				</path>
			</annotationProcessorPaths>
		</configuration>
	</plugin>
</plugins>
- 创建 DTO、VO
//DTO
@Data
public class StudentDto {
    private String userName;
    private String userId;
    private String address;
    private String school;
    private int age;
    private String email;
}

//VO
@Data
@Builder
public class StudentVo {
    private String userName;
    private String userId;
    private String address;
    private String school;
    private int age;
    private String emailAddress;
}
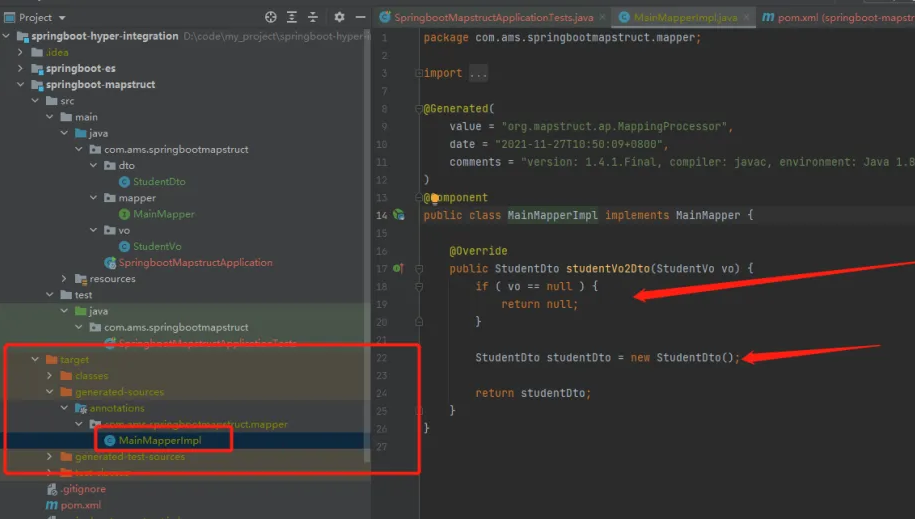
- 创建mapstruct转换器
//componentModel = "spring" 交给spring管理
@Mapper(componentModel = "spring")
public interface MainMapper {
    StudentDto studentVo2Dto(StudentVo vo);
}
- 编写测试用例
@SpringBootTest
class SpringbootMapstructApplicationTests {
    @Autowired
    private MainMapper mainMapper;

    @Test
    void testSimpleMap() {
        StudentVo studentVo = StudentVo.builder()
                .school("清华大学")
                .userId("ams")
                .userName("AI码师")
                .age(27)
                .address("合肥")
                .build();
        StudentDto studentDto = mainMapper.studentVo2Dto(studentVo);
        System.out.println(studentDto);
    }
}
- 查看MainMapper生成的代码
# 不同字段映射
@Mapper
public interface DoctorMapper {

	//Doctor中的specialty字段对应于DoctorDto类的 specialization
    @Mapping(source = "doctor.specialty", target = "specialization")
    DoctorDto toDto(Doctor doctor);
}
# 多个数据源类
有时,单个类不足以构建DTO,我们可能希望将多个类中的值聚合为一个DTO,供终端用户使用
@Data
public class Doctor {
    private int id;
    private String name;
	private String specialty;
}

@Data
public class Education {
    private String degreeName;
    private String institute;
    private Integer yearOfPassing;
}

@Data
public class DoctorDto {
    private int id;
    private String name;
    private String degree;
    private String specialization;
}
接下来,将 DoctorMapper 接口更新为如下代码:
@Mapper
public interface DoctorMapper {

	//如果Education和Doctor包含同名的字段,必须让映射器知道使用哪一个,否则它会抛出一个异常
	@Mapping(source = "doctor.specialty", target = "specialization")
    @Mapping(source = "education.degreeName", target = "degree")
    DoctorDto toDto(Doctor doctor, Education education);
}
# 子对象映射
多数情况下,POJO中不会只包含基本数据类型,其中往往会包含其它类。比如说,一个Doctor类中会有多个患者类:
public class Patient {
    private int id;
    private String name;
}
在Doctor中添加一个患者列表List:
public class Doctor {
    private int id;
    private String name;
    private String specialty;
    private List<Patient> patientList;
}
因为Patient需要转换,为其创建一个对应的DTO:
public class PatientDto {
    private int id;
    private String name;
}
最后,在 DoctorDto 中新增一个存储 PatientDto的列表:
public class DoctorDto {
    private int id;
    private String name;
    private String degree;
    private String specialization;
    private List<PatientDto> patientDtoList;
}
在修改 DoctorMapper之前,我们先创建一个支持 Patient 和 PatientDto 转换的映射器接口:
@Mapper
public interface PatientMapper {
    PatientDto toDto(Patient patient);
}
然后,我们再来修改 DoctorMapper 处理一下患者列表:
//因为我们要处理另一个需要映射的类,所以这里设置了@Mapper注解的uses标志
@Mapper(uses = {PatientMapper.class})
public interface DoctorMapper {

    DoctorMapper INSTANCE = Mappers.getMapper(DoctorMapper.class);

    @Mapping(source = "doctor.patientList", target = "patientDtoList")
    @Mapping(source = "doctor.specialty", target = "specialization")
    DoctorDto toDto(Doctor doctor);
}
# List集合映射
@Mapper(componentModel = "spring")
public interface MainMapper {

    @Mapping(source = "emailAddress", target = "email")
    StudentDto studentVo2Dto(StudentVo vo);
    List<StudentDto> studentListVo2Dto(List<StudentVo> vo);
}
# Set和Map映射
@Mapper
public interface DoctorMapper {

    Set<DoctorDto> setConvert(Set<Doctor> doctor);
    Map<String, DoctorDto> mapConvert(Map<String, Doctor> doctor);
}
# Map和JavaBean的映射
@Mapper
public interface DoctorMapper {

    Doctor toBean(Map<String,String> map);
}


//测试
HashMap<String, String> stringObjectHashMap = new HashMap<>();
stringObjectHashMap.put("id","10");
stringObjectHashMap.put("name","lisi");
Doctor doctor1 = doctorMapper.toBean(stringObjectHashMap);
System.out.println(doctor1);
# 数据类型转换
- 时间格式转换
public class PatientDto {
    private int id;
    private String name;
    private LocalDate dateOfBirth;
}

public class Patient {
    private int id;
    private String name;
    private String dateOfBirth;
}

//映射器
@Mapper
public interface PatientMapper {

    @Mapping(source = "dateOfBirth", target = "dateOfBirth", dateFormat = "dd/MMM/yyyy")
    Patient toModel(PatientDto patientDto);
}
- 数字格式转换
@Mapping(source = "price", target = "price", numberFormat = "$#.00")
- 枚举格式转换
public enum PaymentType {
    CASH,
    CHEQUE,
    CARD_VISA,
    CARD_MASTER,
    CARD_CREDIT
}

public enum PaymentTypeView {
    CASH,
    CHEQUE,
    CARD
}

//两个enum之间的映射器接口
@Mapper
public interface PaymentTypeMapper {
    @ValueMappings({
            @ValueMapping(source = "CARD_VISA", target = "CARD"),
            @ValueMapping(source = "CARD_MASTER", target = "CARD"),
            @ValueMapping(source = "CARD_CREDIT", target = "CARD")
    })
    PaymentTypeView paymentTypeToPaymentTypeView(PaymentType paymentType);
}
# 添加默认值
@Mapping 注解有两个很实用的标志就是常量 constant 和默认值 defaultValue
@Mapper(uses = {PatientMapper.class}, componentModel = "spring")
public interface DoctorMapper {

    @Mapping(target = "id", constant = "-1")
    @Mapping(source = "doctor.patientList", target = "patientDtoList")
    @Mapping(source = "doctor.specialty", target = "specialization", defaultValue = "aa")
    DoctorDto toDto(Doctor doctor);
}
# 文件头类型校验
<dependency>
    <groupId>cn.hutool</groupId>
    <artifactId>hutool-all</artifactId>
    <version>5.8.0.M3</version>
</dependency>
//文件上传拦截器
public class FileInterceptor implements HandlerInterceptor {
    Logger log = LoggerFactory.getLogger(getClass());

    @Override
    public boolean preHandle(HttpServletRequest req, HttpServletResponse resp, Object handler) throws Exception {
        // 判断是否为文件上传请求
        if (req instanceof MultipartHttpServletRequest) {
            MultipartHttpServletRequest multipartReq = (MultipartHttpServletRequest) req;
            Map<String, MultipartFile> files = multipartReq.getFileMap();

            for (String formKey : files.keySet()) {
                MultipartFile file = multipartReq.getFile(formKey);
                //后缀名文件类型
                String filename = file.getOriginalFilename();
                //String suffixType = FileUtil.extName(filename);
                String suffixType = StringUtils.substringAfterLast(filename, ".");
                //文件头文件类型
                String headerType = FileTypeUtil.getType(file.getInputStream());
                //文件头与文件名后缀不匹配
                if (!StringUtils.equalsIgnoreCase(suffixType, headerType)) {
                    String info = String.format("文件头与文件名后缀不匹配。文件名:%s,文件头:%s。", filename, headerType);
                    log.error(info);

                    resp.setStatus(HttpServletResponse.SC_OK);
                    resp.getWriter().write(info);
                    resp.flushBuffer();
                    return false;
                }
            }
        }

        return true;
    }
}
# Resource接口
在日常程序开发中,处理外部资源是很繁琐的事情,我们可能需要处理URL资源、File资源资源、ClassPath相关资源、服务器相关资源(JBoss AS 5.x上的VFS资源)等等很多资源。因此处理这些资源需要使用不同的接口,这就增加了我们系统的复杂性;而且处理这些资源步骤都是类似的(打开资源、读取资源、关闭资源),因此如果能抽象出一个统一的接口来对这些底层资源进行统一访问,是不是很方便,而且使我们系统更加简洁,都是对不同的底层资源使用同一个接口进行访问。
Spring 提供一个Resource接口来统一这些底层资源一致的访问,而且提供了一些便利的接口,从而能提供我们的生产力。
# Resource接口
Spring的Resource接口代表底层外部资源,提供了对底层外部资源的一致性访问接口
public interface InputStreamSource {
	//每次调用都将返回一个新鲜的资源对应的java.io.InputStream字节流
	//调用者在使用完毕后必须关闭该资源
    InputStream getInputStream() throws IOException;
}

//Resource接口继承InputStreamSource接口,并提供一些便利方法
public interface Resource extends InputStreamSource {
	//返回当前Resource代表的底层资源是否存在,true表示存在
    boolean exists();
	//返回当前Resource代表的底层资源是否可读,true表示可读
    boolean isReadable();
	//返回当前Resource代表的底层资源是否已经打开
	//如果返回true,则只能被读取一次然后关闭以避免资源泄露
	//常见的Resource实现一般返回false
    boolean isOpen();
	//如果当前Resource代表的底层资源能由java.util.URL代表,则返回该URL
	//否则抛出IOException
    URL getURL() throws IOException;
	//如果当前Resource代表的底层资源能由java.util.URI代表,则返回该URI
	//否则抛出IOException
    URI getURI() throws IOException;
	//如果当前Resource代表的底层资源能由java.io.File代表,则返回该File
	//否则抛出IOException
    File getFile() throws IOException;
	//返回当前Resource代表的底层文件资源的长度,一般是值代表的文件资源的长度
    long contentLength() throws IOException;
	//返回当前Resource代表的底层资源的最后修改时间
    long lastModified() throws IOException;
	//用于创建相对于当前Resource代表的底层资源的资源,比如当前Resource代表文件资源
	//"d:/test/"则createRelative("test.txt")将返回文件资源"d:/test/test.txt"Resource资源
    Resource createRelative(String relativePath) throws IOException;
	//返回当前Resource代表的底层文件资源的文件路径
	//比如File资源"file://d:/test.txt"将返回"d:/test.txt"
	//而URL资源http://www.baidu.com将返回"",因为只返回文件路径
    String getFilename();
	//返回当前Resource代表的底层资源的描述符,通常就是资源的全路径
    String getDescription();
}
# 内置Resource实现
Resource接口提供了很多内置Resource实现:
- ByteArrayResource:代表byte[]数组资源,对于getInputStream操作将返回一个ByteArrayInputStream
public void testByteArrayResource() {
    Resource resource = new ByteArrayResource("Hello World!".getBytes());
    if(resource.exists()) {
        dumpStream(resource);
    }
}

private void dumpStream(Resource resource) {
    InputStream is = null;
    try {
        //1.获取文件资源
        is = resource.getInputStream();
        //2.读取资源
        byte[] descBytes = new byte[is.available()];
        is.read(descBytes);
        System.out.println(new String(descBytes));
    } catch (IOException e) {
        e.printStackTrace();
    }
    finally {
        try {
            //3.关闭资源
            is.close();
        } catch (IOException e) {
        }
    }
}
注意
ByteArrayResource可多次读取数组资源,即isOpen()永远返回false
- InputStreamResource:代表java.io.InputStream字节流,对于getInputStream操作将直接返回该字节流
public void testInputStreamResource() {
    ByteArrayInputStream bis = new ByteArrayInputStream("Hello World!".getBytes());
    Resource resource = new InputStreamResource(bis);
    if (resource.exists()) {
        dumpStream(resource);
    }
    System.out.println(resource.isOpen());
}
注意
InputStreamResource只能读取一次该字节流,即isOpen()永远返回true
- FileSystemResource:代表java.io.File资源,对于getInputStream操作将返回底层文件的字节流
public void testFileResource() {
    File file = new File("d:/test.txt");
    Resource resource = new FileSystemResource(file);
    if(resource.exists()) {
        dumpStream(resource);
    }
    Assert.assertEquals(false, resource.isOpen());
}
注意
FileSystemResource可多次读取数组资源,即isOpen()永远返回false
- UrlResource:代表URL资源,用于简化URL资源访问
//http:通过标准的http协议访问web资源,如new UrlResource("http://地址");
//ftp:通过ftp协议访问资源,如new UrlResource("ftp://地址");
//file:通过file协议访问本地文件系统资源,如new UrlResource("file:d:/test.txt");


public void testUrlResource() throws IOException {
    Resource resource = new UrlResource("file:d:/test.txt");
    if (resource.exists()) {
        dumpStream(resource);
    }
    System.out.println("path:" + resource.getURL().getPath());
    Assert.assertEquals(false, resource.isOpen());

    Resource resource2 = new UrlResource("http://www.baidu.com");
    if (resource2.exists()) {
        dumpStream(resource2);
    }
    System.out.println("path:" + resource2.getURL().getPath());
    Assert.assertEquals(false, resource2.isOpen());
}
注意
UrlResource可多次读取数组资源,即isOpen()永远返回false
- ClassPathResource:代表classpath路径的资源,将使用ClassLoader进行加载资源
//ClassPathResource提供了三个构造器:

//使用默认的ClassLoader加载path类路径资源;
public ClassPathResource(String path):
//使用指定的ClassLoader加载path类路径资源;
public ClassPathResource(String path, ClassLoader classLoader):
//使用指定的类加载path类路径资源,将加载相对于当前类的路径的资源;
public ClassPathResource(String path, Class<?> clazz):


/**
 * 使用默认的加载器加载资源,将加载当前ClassLoader类路径上相对于根路径的资源
 * @throws IOException
 */
@Test
public void testClasspathResourceByDefaultClassLoader() throws IOException {
	Resource resource = new ClassPathResource("test1.properties");
	if (resource.exists()) {
		dumpStream(resource);
	}
	System.out.println("path:" + resource.getFile().getAbsolutePath());
	Assert.assertEquals(false, resource.isOpen());
}

/**
 * 使用指定的ClassLoader进行加载资源,将加载指定的ClassLoader类路径上相对于根路径
 * 的资源
 * @throws IOException
 */
@Test
public void testClasspathResourceByClassLoader() throws IOException {
//ClassLoader loader = Thread.currentThread().getContextClassLoader();
//System.out.println(loader.getResource("").getPath());
	ClassLoader cl = this.getClass().getClassLoader();
	Resource resource = new ClassPathResource("test1.properties", cl);
	if (resource.exists()) {
		dumpStream(resource);
	}
	System.out.println("path:" + resource.getFile().getAbsolutePath());
	Assert.assertEquals(false, resource.isOpen());
}

/**
 * 使用指定的类进行加载资源,将尝试加载相对于当前类的路径的资源
 * @throws IOException
 */
@Test
public void testClasspathResourceByClass() throws IOException {
	Class clazz = this.getClass();
	Resource resource1 = new ClassPathResource("/test1.properties", clazz);
	if (resource1.exists()) {
		dumpStream(resource1);
	}
	System.out.println("path:" + resource1.getFile().getAbsolutePath());
	Assert.assertEquals(false, resource1.isOpen());

	Resource resource2 = new ClassPathResource("/test1.properties", this.getClass());
	if (resource2.exists()) {
		dumpStream(resource2);
	}
	System.out.println("path:" + resource2.getFile().getAbsolutePath());
	Assert.assertEquals(false, resource2.isOpen());

}

/**
 * 加载jar包里的资源,首先在当前类路径下找不到,最后才到Jar包里找,而且在第一个Jar
 * 包里找到的将被返回
 * @throws IOException
 */
@Test
public void testClasspathResourceFromJar() throws IOException {
	Resource resource = new ClassPathResource("overview.html");
	if (resource.exists()) {
		dumpStream(resource);
	}
	System.out.println("path:" + resource.getURL().getPath());
	Assert.assertEquals(false, resource.isOpen());
}
# ServerHttpRequest
ServerHttpRequest和HttpServletRequest的区别
HttpServletRequest 是tomcat提供的,ServerHttpRequest 是 spring框架提供的
ServerHttpRequest接口的实现类ServletServerHttpRequest,可通过方法getServletRequest()获取HttpServletRequest
if(exchange.getRequest() instanceof ServletServerHttpRequest) {
   ServletServerHttpRequest request = (ServletServerHttpRequest) exchange.getRequest();
   HttpServletRequest httpServletRequest = request.getServletRequest();
}
ServerHttpRequest的主要适用场景:
- 在使用springboot的websocket时,获取url中的参数
public class HandShake extends HttpSessionHandshakeInterceptor {

    /**
     * 握手前参数和权限设置与校验
     */
    @Override
    public boolean beforeHandshake(ServerHttpRequest request, ServerHttpResponse response,
                                   WebSocketHandler wsHandler,
                                   Map<String, Object> attributes) {
        // 初始化Session信息
        ServletServerHttpRequest servletRequest = (ServletServerHttpRequest) request;
        // 获取参数 必填校验
        String xxx = servletRequest.getServletRequest().getParameter(xxx);
	}
}
- 在网关接口中获取相关request
@PostMapping("/captch")
public Mono<Result> getCaptch(ServerWebExchange exchange){
    ServerHttpRequest request = exchange.getRequest();
}
- webflux使用ServerHttpRequest 获取多body体内容
@RequestMapping(value="/testBodys",method=RequestMethod.GET)
@ResponseBody
public Mono<ResponseEntity> testHttpRequest(ServerHttpRequest httpRequest){
   return Mono.justOrEmpty(new ResponseEntity(HttpStatus.OK));
}
# Jar包加密
# 采用classfinal-maven-plugin插件
直接配置一个插件就可以实现源码的安全性保护。并且可以对yml、properties配置文件以及lib目录下的maven依赖进行加密处理。若想指定机器启动,支持绑定机器,项目加密后只能在特定机器运行
# 功能特点
- 加密后,方法体被清空,保留方法参数、注解等信息.主要兼容swagger文档注解扫描
- 方法体被清空后,反编译只能看到方法名和注解,看不到方法体的具体内容
- 加密后的项目需要设置javaagent来启动,启动过程中解密class,完全内存解密,不留下任何解密后的文件
- 启动加密后的jar,生成xxx-encrypted.jar,这个就是加密后的jar文件,加密后不可直接执行
# 无密码启动方式
java -javaagent:xxx-encrypted.jar -jar xxx-encrypted.jar

# 有密码启动方式
java -javaagent:xxx-encrypted.jar='-pwd= 密码' -jar xxx-encrypted.jar
<!-- 在启动类的pom.xml文件中加如下插件-->
<build>
	<plugins>
		<plugin>
			<groupId>org.springframework.boot</groupId>
			<artifactId>spring-boot-maven-plugin</artifactId>
		</plugin>
		<plugin>
			<groupId>net.roseboy</groupId>
			<artifactId>classfinal-maven-plugin</artifactId>
			<version>1.2.1</version>
			<configuration>
			    <!-- #表示启动时不需要密码,只是一个启动密码,对于代码混淆来说没什么用 -->
				<password>#</password>
				<excludes>org.spring</excludes>
				<!-- 加密的包名,多个包用逗号分开 -->
				<packages>${groupId}</packages>
				<!-- 加密的配置文件,多个包用逗号分开 -->
				<cfgfiles>application.yml,application-dev.yml</cfgfiles>
				<!-- jar包lib下面要加密的jar依赖文件,多个包用逗号分开 -->
				<libjars>hutool-all.jar</libjars>
				<!-- 指定机器启动,机器码 -->
				<code>xxxx</code>
			</configuration>
			<executions>
				<execution>
					<phase>package</phase>
					<goals>
						<goal>classFinal</goal>
					</goals>
				</execution>
			</executions>
		</plugin>
	</plugins>
</build>
注意
该插件时要放到spring-boot-maven-plugin插件后面,否则不起作用
# 如何绑定机器启动
下载到classfinal-fatjar-1.2.1.jar依赖,在当前依赖下cmd执行java -jar classfinal-fatjar-1.2.1.jar -C命令,会自动生成一串机器码
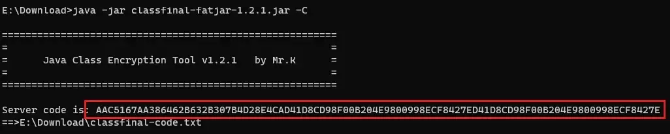
将此生成好的机器码,放到maven插件中的code里面即可
# 实现数据库配置文件的加密
在SpringBoot中我们可以通过Jasypt来进行数据库配置信息的加密操作,Jasypt是一个用于加密和解密敏感数据的Java 库,可以与Spring Boot实现无缝的集成
- 在项目中引入Jasypt Starter的依赖配置,如下所示
<dependency>
    <groupId>com.github.ulisesbocchio</groupId>
    <artifactId>jasypt-spring-boot-starter</artifactId>
    <version>3.0.5</version>
</dependency>
- 在本地application-dev.yml文件中添加Jasypt配置
jasypt:
  encryptor:
    # 盐值
    password: 123
    # 指定加密方式
    algorithm: PBEWithMD5AndDES
    iv-generator-classname: org.jasypt.iv.NoIvGenerator
    property:
      # 标识为加密属性的前缀
      prefix: ENC(
      # 标识为加密属性的后缀
      suffix: )
注意
这里是解密配置,加密时的算法和盐值必须与以上配置中的algorithm与password(盐值)一致
- 编写JasyptUtil工具类用于加密/解密
public class JasyptUtil {

    /**
     * PBE 算法
     */
    public static final String PBE_ALGORITHMS_MD5_DES = "PBEWITHMD5ANDDES";
    public static final String PBE_ALGORITHMS_MD5_TRIPLEDES = "PBEWITHMD5ANDTRIPLEDES";
    public static final String PBE_ALGORITHMS_SHA1_DESEDE = "PBEWITHSHA1ANDDESEDE";
    public static final String PBE_ALGORITHMS_SHA1_RC2_40 = "PBEWITHSHA1ANDRC2_40";

    private JasyptUtil() {
    }

    /**
     * Jasypt 加密
     *
     * @param encryptedStr 加密字符串
     * @param password     盐值
     * @return
     */
    public static String encrypt(String encryptedStr, String password) {
        return encrypt(encryptedStr, PBE_ALGORITHMS_MD5_DES, password);
    }

    /**
     * Jasypt 加密
     *
     * @param encryptedStr 加密字符串
     * @param algorithm    加密算法
     *                     PBE ALGORITHMS: [PBEWITHMD5ANDDES,
	 *                                      PBEWITHMD5ANDTRIPLEDES,
	 *                                      PBEWITHSHA1ANDDESEDE,
	 *                                      PBEWITHSHA1ANDRC2_40]
     * @param password     盐值
     * @return
     */
    public static String encrypt(String encryptedStr, String algorithm, String password) {
        // StandardPBEStringEncryptor
		// StandardPBEBigDecimalEncryptor
		// StandardPBEBigIntegerEncryptor
		// StandardPBEByteEncryptor
        StandardPBEStringEncryptor encryptor = new StandardPBEStringEncryptor();
        EnvironmentPBEConfig config = new EnvironmentPBEConfig();

        // 指定加密算法
        config.setAlgorithm(algorithm);
        // 加密盐值
        config.setPassword(password);
        //config.setIvGeneratorClassName("org.jasypt.iv.NoIvGenerator");
        encryptor.setConfig(config);

        // 加密
        return encryptor.encrypt(encryptedStr);
    }

    /**
     * Jasypt 解密
     *
     * @param decryptStr 解密字符串
     * @param password   盐值
     * @return
     */
    public static String decrypt(String decryptStr, String password) {
        return decrypt(decryptStr, PBE_ALGORITHMS_MD5_DES, password);
    }

    /**
     * Jasypt 解密
     *
     * @param decryptStr 解密字符串
     * @param algorithm  指定解密算法:解密算法要与加密算法一一对应
     *                   PBE ALGORITHMS: [PBEWITHMD5ANDDES,
	 *                                    PBEWITHMD5ANDTRIPLEDES,
	 *                                    PBEWITHSHA1ANDDESEDE,
	 *                                    PBEWITHSHA1ANDRC2_40]
     * @param password   盐值
     * @return
     */
    public static String decrypt(String decryptStr, String algorithm, String password) {
        // StandardPBEStringEncryptor
		// StandardPBEBigDecimalEncryptor
		// StandardPBEBigIntegerEncryptor
		// StandardPBEByteEncryptor
        StandardPBEStringEncryptor encryptor = new StandardPBEStringEncryptor();
        EnvironmentPBEConfig config = new EnvironmentPBEConfig();

        // 指定解密算法:解密算法要与加密算法一一对应
        config.setAlgorithm(algorithm);
        // 加密秘钥
        config.setPassword(password);
        //config.setIvGeneratorClassName("org.jasypt.iv.NoIvGenerator");
        encryptor.setConfig(config);

        // 解密
        return encryptor.decrypt(decryptStr);
    }

    public static void main(String[] args) {
        String encryptedStr = "I am the string to be encrypted";
        String algorithm = PBE_ALGORITHMS_SHA1_RC2_40;
        String password = "salt";

        String str = JasyptUtil.encrypt(encryptedStr, algorithm, password);
        System.out.println("加密后的字符串:" + str);
        System.out.println("解密后的字符串:" + JasyptUtil.decrypt(str,algorithm,password));
    }
}
- 编写测试类进行测试jasypt加密测试
package com.agileboot.admin.jasypt;
import com.agileboot.common.utils.jasypt.JasyptUtil;
import org.junit.jupiter.api.Test;
import org.springframework.boot.test.context.SpringBootTest;

@SpringBootTest
public class jasyptTest {

    /**
     * PBE 算法
     */
    public static final String PBE_ALGORITHMS_MD5_DES = "PBEWITHMD5ANDDES";
    public static final String PBE_ALGORITHMS_MD5_TRIPLEDES = "PBEWITHMD5ANDTRIPLEDES";
    public static final String PBE_ALGORITHMS_SHA1_DESEDE = "PBEWITHSHA1ANDDESEDE";
    public static final String PBE_ALGORITHMS_SHA1_RC2_40 = "PBEWITHSHA1ANDRC2_40";


    @Test
    public void TsetJasypt() {
        String encryptedStr = "root";
        String algorithm = PBE_ALGORITHMS_MD5_DES;
        String password = "salt";
        String str = JasyptUtil.encrypt(encryptedStr, algorithm, password);
        System.out.println("加密后的字符串:" + str);
        System.out.println("解密后的字符串:" + JasyptUtil.decrypt(str,algorithm,password));
    }
}
- 在Spring Boot的配置文件中配置加密属性,ENC()的内容就是加密后的内容
spring.datasource.username=ENC(encryptedUsername)
spring.datasource.password=ENC(encryptedPassword)
- 启动类加上@EnableEncryptableProperties这个注解,用于自动解密
@SpringBootApplication(exclude = { DataSourceAutoConfiguration.class })
@EnableEncryptableProperties
public class RuoYiApplication
{
    public static void main(String[] args)
    {
        SpringApplication.run(RuoYiApplication.class, args);
    }
}
- Jasypt 会在运行时自动解密 ENC() 中的内容,所以不需要额外的代码就可以访问解密后的值
@RestController
public class TestController {

    @Value("${spring.datasource.username}")
    private String username;

    @Value("${spring.datasource.password}")
    private String password;

    @GetMapping("/db-credentials")
    public String getCredentials() {
        return "Username: " + username + ", Password: " + password;
    }
}
# 文件上传之秒传/断点续传/分片上传
# 秒传
# 简单来说,当你尝试上传某个文件时,服务器会首先进行MD5校验
# 如果服务器上已经存在与该文件MD5值相同的文件,服务器就会直接给你一个新地址
# 这样你下载或访问的其实都是服务器上已有的那个文件,这个过程就被称为"秒传"
# 想要避免秒传,关键在于改变文件的MD5值,因为MD5值是文件内容的唯一标识
# 仅仅改变文件名是不足以改变MD5值的,需要对文件进行实质性的修改,比如在一个文本文件中添加几个字
# 这样文件的MD5值就会改变,上传时就不会被识别为重复文件,从而实现非秒传上传
- 前端代码
<!DOCTYPE html>
<html lang="en">
<head>
    <meta charset="UTF-8">
    <title>秒传文件上传</title>
</head>
<body>
    <input type="file" id="fileInput" />
    <button onclick="uploadFile()">上传文件</button>

    <script>
        async function uploadFile() {
            const fileInput = document.getElementById('fileInput');
            const file = fileInput.files[0];
            if (!file) {
                alert('请选择文件');
                return;
            }

            const formData = new FormData();
            formData.append('file', file);

            try {
                const response = await fetch('/upload', {
                    method: 'POST',
                    body: formData
                });
                const result = await response.json();
                if (result.success) {
                    alert('文件上传成功');
                } else {
                    alert('文件上传失败');
                }
            } catch (error) {
                console.error('文件上传失败:', error);
            }
        }
    </script>
</body>
</html>
- 后端代码
import org.springframework.beans.factory.annotation.Autowired;
import org.springframework.boot.SpringApplication;
import org.springframework.boot.autoconfigure.SpringBootApplication;
import org.springframework.data.redis.core.RedisTemplate;
import org.springframework.web.bind.annotation.PostMapping;
import org.springframework.web.bind.annotation.RequestParam;
import org.springframework.web.bind.annotation.RestController;
import org.springframework.web.multipart.MultipartFile;

import java.io.IOException;
import java.nio.file.Files;
import java.nio.file.Path;
import java.nio.file.Paths;
import java.security.MessageDigest;
import java.security.NoSuchAlgorithmException;
import java.util.Arrays;

@SpringBootApplication
public class FileUploadApplication {
    public static void main(String[] args) {
        SpringApplication.run(FileUploadApplication.class, args);
    }
}

@RestController
public class FileUploadController {

    @Autowired
    private RedisTemplate<String, String> redisTemplate;

    @PostMapping("/upload")
    public String uploadFile(@RequestParam("file") MultipartFile file) {
        try {
            Path path = Paths.get("uploads/" + file.getOriginalFilename());
            if (!Files.exists(path.getParent())) {
                Files.createDirectories(path.getParent());
            }
            file.transferTo(path.toFile());

            String fileMd5 = getFileMd5(file.getInputStream());
            String key = "file_" + fileMd5;

            if (redisTemplate.opsForValue().get(key) != null) {
                return "秒传成功";
            } else {
                redisTemplate.opsForValue().set(key, "false");
                redisTemplate.opsForValue().set("block_" + fileMd5, path.toString());
                return "文件正在上传中";
            }
        } catch (IOException | NoSuchAlgorithmException e) {
            return "文件上传失败";
        }
    }

    private String getFileMd5(InputStream inputStream) throws NoSuchAlgorithmException,
	                                                          IOException {
        MessageDigest digest = MessageDigest.getInstance("MD5");
        byte[] hash = digest.digest(inputStream.readAllBytes());
        return String.format("%032x", new BigInteger(1, hash));
    }
}
- 配置文件
spring.servlet.multipart.max-file-size=2MB
spring.servlet.multipart.max-request-size=10MB

# Redis配置
spring.redis.host=localhost
spring.redis.port=6379
# 分片上传
# 分片上传是一种高效处理大文件上传的方法,其核心是将大文件按照预设的大小切割成多个较小的数据分片
# 在上传过程中,前端会记录分片的总数以及当前正在上传的分片编号,并通知后端相应的信息
# 待所有分片均成功上传至服务器后,后端将负责将这些分散的分片重新组合拼接,还原成原始的完整文件
# 这样,即便是面对体积庞大的文件,也能通过分片的方式实现顺畅且稳定的上传过程

# 注:大文件的分片是在前端做的,不是后端!
- 前端代码
# 前端上传代码计算文件MD5值用了spark-md5这个库,使用也是比较简单的
# 为什么要计算MD5,因为文件在传输写入过程中可能会出现错误,导致最终合成的文件可能和原文件不一样
# 所以要对比一下前端计算的MD5和后端计算的MD5是不是一样,保证上传数据的一致性
<!DOCTYPE html>
<html lang="en">
<head>
  <meta charset="UTF-8">
  <title>分片上传</title>
  <script src="https://cdn.bootcdn.net/ajax/libs/spark-md5/3.0.2/spark-md5.min.js"></script>
</head>

<body>
<form enctype="multipart/form-data">
    <input type="file" name="fileInput" id="fileInput">
    <input type="button" value="计算文件MD5" onclick="calculateFileMD5()">
    <input type="button" value="上传" onclick="uploadFile()">
    <input type="button" value="检测文件完整性" onclick="checkFile()">
</form>
<p>
    文件MD5:
    <span id="fileMd5"></span>
</p>
<p>
    上传结果:
    <span id="uploadResult"></span>
</p>
<p>
    检测文件完整性:
    <span id="checkFileRes"></span>
</p>

<script>
    //每片的大小
    var chunkSize = 1 * 1024 * 1024;
    var uploadResult = document.getElementById("uploadResult")
    var fileMd5Span = document.getElementById("fileMd5")
    var checkFileRes = document.getElementById("checkFileRes")
    var  fileMd5;


    function  calculateFileMD5(){
        var fileInput = document.getElementById('fileInput');
        var file = fileInput.files[0];
        getFileMd5(file).then((md5) => {
            console.info(md5)
            fileMd5=md5;
            fileMd5Span.innerHTML=md5;
        })
    }

    function uploadFile() {
        var fileInput = document.getElementById('fileInput');
        var file = fileInput.files[0];
        if (!file) return;
        if (!fileMd5) return;


        //获取到文件
        let fileArr = this.sliceFile(file);
        //保存文件名称
        let fileName = file.name;

        fileArr.forEach((e, i) => {
            //创建formdata对象
            let data = new FormData();
            data.append("totalNumber", fileArr.length)
            data.append("chunkSize", chunkSize)
            data.append("chunkNumber", i)
            data.append("md5", fileMd5)
            data.append("file", new File([e],fileName));
            upload(data);
        })
    }

    /**
     * 计算文件md5值
     */
    function getFileMd5(file) {
        return new Promise((resolve, reject) => {
            let fileReader = new FileReader()
            fileReader.onload = function (event) {
                let fileMd5 = SparkMD5.ArrayBuffer.hash(event.target.result)
                resolve(fileMd5)
            }
            fileReader.readAsArrayBuffer(file)
        })
    }

   function upload(data) {
       var xhr = new XMLHttpRequest();
       // 当上传完成时调用
       xhr.onload = function () {
           if (xhr.status === 200) {
               uploadResult.append( '上传成功分片:' +data.get("chunkNumber")+'\t' ) ;
           }
       }
       xhr.onerror = function () {
           uploadResult.innerHTML = '上传失败';
       }
       // 发送请求
       xhr.open('POST', '/uploadBig', true);
       xhr.send(data);
    }

    function checkFile() {
        var xhr = new XMLHttpRequest();
        // 当上传完成时调用
        xhr.onload = function () {
            if (xhr.status === 200) {
                checkFileRes.innerHTML = '检测文件完整性成功:' + xhr.responseText;
            }
        }
        xhr.onerror = function () {
            checkFileRes.innerHTML = '检测文件完整性失败';
        }
        // 发送请求
        xhr.open('POST', '/checkFile', true);
        let data = new FormData();
        data.append("md5", fileMd5)
        xhr.send(data);
    }

    function sliceFile(file) {
        const chunks = [];
        let start = 0;
        let end;
        while (start < file.size) {
            end = Math.min(start + chunkSize, file.size);
            chunks.push(file.slice(start, end));
            start = end;
        }
        return chunks;
    }
</script>

</body>
</html>
- 后端就两个接口/uploadBig用于每一片文件的上传和/checkFile检测文件的MD5
# 这里需要注意的:

# MD5.conf每一次检测文件不存在里创建个空文件,使用byte[] bytes = new byte[totalNumber]
# 将每一位状态设置为0,从0位天始,第N位表示第N个分片的上传状态,0-未上传 1-已上传
# 当每将上传成功后使用randomAccessConfFile.seek(chunkNumber)将对就设置为1

# randomAccessFile.seek(chunkNumber * chunkSize)
# 可以将光标移到文件指定位置开始写数据,每一个文件每将上传分片编号chunkNumber都是不一样的
# 所以各自写自己文件块,多线程写同一个文件不会出现线程安全问题

# 大文件写入时用RandomAccessFile可能比较慢,可以使用MappedByteBuffer内存映射来加速大文件写入
# 不过使用MappedByteBuffer如果要删除文件可能会删除不掉,因为删了磁盘上的文件,内存的文件还存在
@RestController
public class UploadController {

    public static final String UPLOAD_PATH = "D:\\upload\\";

    /**
     * @param chunkSize 每个分片大小
     * @param chunkNumber 当前分片
     * @param md5 文件总MD5
     * @param file 当前分片文件数据
     * @return
     * @throws IOException
     */
    @RequestMapping("/uploadBig")
    public ResponseEntity<Map<String, String>> uploadBig(@RequestParam Long chunkSize,
	                                                     @RequestParam Integer totalNumber,
														 @RequestParam Long chunkNumber,
														 @RequestParam String md5,
														 @RequestParam MultipartFile file)
														 throws IOException {
        //文件存放位置
        String dstFile = String.format("%s\\%s\\%s.%s", UPLOAD_PATH, md5, md5,
		                 StringUtils.getFilenameExtension(file.getOriginalFilename()));
        //上传分片信息存放位置
        String confFile = String.format("%s\\%s\\%s.conf", UPLOAD_PATH, md5, md5);
        //第一次创建分片记录文件
        //创建目录
        File dir = new File(dstFile).getParentFile();
        if (!dir.exists()) {
            dir.mkdir();
            //所有分片状态设置为0
            byte[] bytes = new byte[totalNumber];
            Files.write(Path.of(confFile), bytes);
        }
        //随机分片写入文件
        try (RandomAccessFile randomAccessFile = new RandomAccessFile(dstFile, "rw");
             RandomAccessFile randomAccessConfFile = new RandomAccessFile(confFile, "rw");
             InputStream inputStream = file.getInputStream()) {
            //定位到该分片的偏移量
            randomAccessFile.seek(chunkNumber * chunkSize);
            //写入该分片数据
            randomAccessFile.write(inputStream.readAllBytes());
            //定位到当前分片状态位置
            randomAccessConfFile.seek(chunkNumber);
            //设置当前分片上传状态为1
            randomAccessConfFile.write(1);
        }
        return ResponseEntity.ok(Map.of("path", dstFile));
    }


    /**
     * 获取文件分片状态,检测文件MD5合法性
     *
     * @param md5
     * @return
     * @throws Exception
     */
    @RequestMapping("/checkFile")
    public ResponseEntity<Map<String, String>> uploadBig(@RequestParam String md5)
	                                                                  throws Exception {
        String uploadPath = String.format("%s\\%s\\%s.conf", UPLOAD_PATH, md5, md5);
        Path path = Path.of(uploadPath);
        //MD5目录不存在文件从未上传过
        if (!Files.exists(path.getParent())) {
            return ResponseEntity.ok(Map.of("msg", "文件未上传"));
        }
        //判断文件是否上传成功
        StringBuilder stringBuilder = new StringBuilder();
        byte[] bytes = Files.readAllBytes(path);
        for (byte b : bytes) {
            stringBuilder.append(String.valueOf(b));
        }
        //所有分片上传完成计算文件MD5
        if (!stringBuilder.toString().contains("0")) {
            File file = new File(String.format("%s\\%s\\", UPLOAD_PATH, md5));
            File[] files = file.listFiles();
            String filePath = "";
            for (File f : files) {
                //计算文件MD5是否相等
                if (!f.getName().contains("conf")) {
                    filePath = f.getAbsolutePath();
                    try (InputStream inputStream = new FileInputStream(f)) {
                        String md5pwd = DigestUtils.md5DigestAsHex(inputStream);
                        if (!md5pwd.equalsIgnoreCase(md5)) {
                            return ResponseEntity.ok(Map.of("msg", "文件上传失败"));
                        }
                    }
                }
            }
            return ResponseEntity.ok(Map.of("path", filePath));
        } else {
            //文件未上传完成,反回每个分片状态,前端将未上传的分片继续上传
            return ResponseEntity.ok(Map.of("chucks", stringBuilder.toString()));
        }
    }
}
# 断点续传
# 断点续传是一种先进的文件上传技术,专为解决大文件上传过程中可能遇到的中断问题而设计
# 该技术允许在上传流程被意外打断后,用户能够从中断的具体位置继续上传,而无需从头开始整个文件的传输
# 这一特性在上传大文件时尤为关键,因为它能够大幅度缩短上传所需的时间,显著提升用户体验和效率

# 实现断点续传的核心机制通常涉及一个特定的接口,如/checkFile
# 该接口的作用是在上传开始前或过程中被调用,以检查服务器上是否存在该文件的部分上传记录
# 如果文件中有尚未完成上传的分片(即之前上传过程中断留下的数据片段)
# checkFile接口会返回一个包含chunks值的响应,其中对应位置的分片如果尚未上传完成,其值将被标记为0
# 前端接收到这个响应后,会智能地识别出哪些分片是已经上传成功的,哪些是需要继续上传的
# 并仅针对那些未完成的分片发起上传请求。一旦所有未完成的分片都被成功上传
# 前端会再次调用/checkFile接口进行最终的检查,确认所有分片都已完整上传,从而完成整个断点续传的过程
- 前端代码
<!DOCTYPE html>
<html lang="en">
<head>
  <meta charset="UTF-8">
  <title>分片上传</title>
  <script src="https://cdn.bootcdn.net/ajax/libs/spark-md5/3.0.2/spark-md5.min.js"></script>
</head>
<body>
分片上传

<form enctype="multipart/form-data">
    <input type="file" name="fileInput" id="fileInput">
    <input type="button" value="计算文件MD5" onclick="calculateFileMD5()">
    <input type="button" value="上传" onclick="uploadFile()">
    <input type="button" value="检测文件完整性" onclick="checkFile()">
</form>

<p>
    文件MD5:
    <span id="fileMd5"></span>
</p>
<p>
    上传结果:
    <span id="uploadResult"></span>
</p>
<p>
    检测文件完整性:
    <span id="checkFileRes"></span>
</p>


<script>
    //每片的大小
    var chunkSize = 1 * 1024 * 1024;
    var uploadResult = document.getElementById("uploadResult")
    var fileMd5Span = document.getElementById("fileMd5")
    var checkFileRes = document.getElementById("checkFileRes")
    var  fileMd5;


    function  calculateFileMD5(){
        var fileInput = document.getElementById('fileInput');
        var file = fileInput.files[0];
        getFileMd5(file).then((md5) => {
            console.info(md5)
            fileMd5=md5;
            fileMd5Span.innerHTML=md5;
        })
    }

    function uploadFile() {
        var fileInput = document.getElementById('fileInput');
        var file = fileInput.files[0];
        if (!file) return;
        if (!fileMd5) return;


        //获取到文件
        let fileArr = this.sliceFile(file);
        //保存文件名称
        let fileName = file.name;

        fileArr.forEach((e, i) => {
            //创建formdata对象
            let data = new FormData();
            data.append("totalNumber", fileArr.length)
            data.append("chunkSize", chunkSize)
            data.append("chunkNumber", i)
            data.append("md5", fileMd5)
            data.append("file", new File([e],fileName));
            upload(data);
        })


    }

    /**
     * 计算文件md5值
     */
    function getFileMd5(file) {
        return new Promise((resolve, reject) => {
            let fileReader = new FileReader()
            fileReader.onload = function (event) {
                let fileMd5 = SparkMD5.ArrayBuffer.hash(event.target.result)
                resolve(fileMd5)
            }
            fileReader.readAsArrayBuffer(file)
        })
    }


   function upload(data) {
       var xhr = new XMLHttpRequest();
       // 当上传完成时调用
       xhr.onload = function () {
           if (xhr.status === 200) {
               uploadResult.append( '上传成功分片:' +data.get("chunkNumber")+'\t' ) ;
           }
       }
       xhr.onerror = function () {
           uploadResult.innerHTML = '上传失败';
       }
       // 发送请求
       xhr.open('POST', '/uploadBig', true);
       xhr.send(data);
    }

    function checkFile() {
        var xhr = new XMLHttpRequest();
        // 当上传完成时调用
        xhr.onload = function () {
            if (xhr.status === 200) {
                checkFileRes.innerHTML = '检测文件完整性成功:' + xhr.responseText;
            }
        }
        xhr.onerror = function () {
            checkFileRes.innerHTML = '检测文件完整性失败';
        }
        // 发送请求
        xhr.open('POST', '/checkFile', true);
        let data = new FormData();
        data.append("md5", fileMd5)
        xhr.send(data);
    }

    function sliceFile(file) {
        const chunks = [];
        let start = 0;
        let end;
        while (start < file.size) {
            end = Math.min(start + chunkSize, file.size);
            chunks.push(file.slice(start, end));
            start = end;
        }
        return chunks;
    }

// 其他代码保持不变...
function checkFileAndContinue() {
    var xhr = new XMLHttpRequest();
    xhr.open('POST', '/checkFile', true);
    let data = new FormData();
    data.append("md5", fileMd5);
    xhr.onreadystatechange = function () {
        if (xhr.readyState === 4) {
            if (xhr.status === 200) {
                const response = JSON.parse(xhr.responseText);
                if (response.msg === '文件未上传') {
                    // 文件未上传,开始上传所有分片
                    uploadFile();
                } else if (response.msg === '文件上传失败') {
                    uploadResult.innerHTML = '文件MD5校验失败';
                } else {
                    // 有分片未上传,继续上传未完成的分片
                    const chunksStatus = response.chucks;
                    let chunksToUpload = [];
                    for (let i = 0; i < chunksStatus.length; i++) {
                        if (chunksStatus.charAt(i) === '0') {
                            chunksToUpload.push(fileArr[i]);
                        }
                    }
                    if (chunksToUpload.length > 0) {
                        uploadChunks(chunksToUpload);
                    } else {
                        uploadResult.innerHTML = '所有分片已上传';
                    }
                }
            } else {
                uploadResult.innerHTML = '检查文件状态失败';
            }
        }
    };
    xhr.send(data);
}

function uploadChunks(chunksToUpload) {
    chunksToUpload.forEach((chunk, i) => {
        let data = new FormData();
        data.append("totalNumber", fileArr.length);
        data.append("chunkSize", chunkSize);
        data.append("chunkNumber", i);
        data.append("md5", fileMd5);
        data.append("file", new File([chunk], fileName));
        upload(data);
    });
}

// 在用户选择文件后,先计算MD5并检查文件上传状态
document.getElementById('fileInput').addEventListener('change', function() {
    var fileInput = document.getElementById('fileInput');
    var file = fileInput.files[0];
    if (file) {
        calculateFileMD5(file).then(md5 => {
            fileMd5 = md5;
            fileMd5Span.innerHTML = md5;
            checkFileAndContinue(); // 检查文件上传状态
        });
    }
});
</script>

</body>
</html>
- 后端代码
import org.apache.commons.io.FileUtils;
import org.apache.commons.io.IOUtils;
import org.springframework.http.ResponseEntity;
import org.springframework.web.bind.annotation.*;
import org.springframework.web.multipart.MultipartFile;
import java.io.*;
import java.nio.ByteBuffer;
import java.nio.channels.FileChannel;
import java.nio.file.*;
import java.util.HashMap;
import java.util.Map;

@RestController
public class UploadController {

    public static final String UPLOAD_PATH = "D:\\upload\\";

    /**
     * 上传分片文件
     *
     * @param chunkSize 每个分片大小
     * @param totalNumber 总分片数
     * @param chunkNumber 当前分片编号
     * @param md5 文件MD5
     * @param file 当前分片文件数据
     * @return
     * @throws IOException
     */
    @PostMapping("/uploadBig")
    public ResponseEntity<Map<String, String>> uploadBig(
            @RequestParam("chunkSize") Long chunkSize,
            @RequestParam("totalNumber") Integer totalNumber,
            @RequestParam("chunkNumber") Integer chunkNumber,
            @RequestParam("md5") String md5,
            @RequestParam("file") MultipartFile file) throws IOException {

        // 确保文件目录存在
        String dirPath = String.format("%s%s\\", UPLOAD_PATH, md5);
        File dir = new File(dirPath);
        if (!dir.exists()) {
            dir.mkdirs();
        }

        // 文件存放位置
        String fileName = String.format("%s.part", md5);
        String dstFilePath = String.format("%s%s\\%s", UPLOAD_PATH, md5, fileName);
        // 分片信息存放位置
        String confFilePath = String.format("%s%s\\%s.conf", UPLOAD_PATH, md5, md5);

        // 写入分片数据
        try (FileOutputStream fos = new FileOutputStream(dstFilePath, true);
             FileChannel fileChannel = fos.getChannel();
             InputStream is = file.getInputStream()) {
            long offset = (long) chunkNumber * chunkSize;
            fileChannel.position(offset);
            fileChannel.transferFrom(is.getChannel(), offset, file.getSize());
        }

        // 更新分片状态
        byte[] statusArray = new byte[totalNumber];
        int index = chunkNumber;
        if (!Files.exists(Paths.get(confFilePath))) {
            try (FileOutputStream confFos = new FileOutputStream(confFilePath)) {
                confFos.write(statusArray);
            }
        }
        statusArray[index] = 1;
        try (RandomAccessFile randomAccessFile = new RandomAccessFile(confFilePath, "rw")){
            randomAccessFile.seek(index);
            randomAccessFile.write(statusArray[index]);
        }

        Map<String, String> response = new HashMap<>();
        response.put("path", dstFilePath);
        return ResponseEntity.ok(response);
    }

    /**
     * 检查文件分片状态,检测文件MD5合法性
     *
     * @param md5 文件MD5
     * @return
     * @throws IOException
     */
    @PostMapping("/checkFile")
    public ResponseEntity<Map<String, Object>> checkFile(@RequestParam("md5") String md5)
	                                                                 throws IOException {
        String confFilePath = String.format("%s%s\\%s.conf", UPLOAD_PATH, md5, md5);
        Path confPath = Paths.get(confFilePath);

        if (!Files.exists(confPath.getParent())) {
            return ResponseEntity.ok(Map.of("msg", "文件未上传"));
        }

        boolean isComplete = true;
        try (RandomAccessFile accessFile = new RandomAccessFile(confFilePath, "r")) {
            for (int i = 0; i < accessFile.length(); i++) {
                if (accessFile.readByte() == 0) {
                    isComplete = false;
                    break;
                }
            }
        }

        if (isComplete) {
            // 计算合并后的文件MD5
            String finalFilePath = String.format("%s%s\\%s", UPLOAD_PATH, md5, md5);
            try (InputStream is = new FileInputStream(finalFilePath)) {
                String calculatedMd5 = DigestUtils.md5Hex(IOUtils.toByteArray(is));
                return ResponseEntity.ok(Map.of("msg", "文件上传成功", "md5",calculatedMd5));
            } catch (IOException e) {
                return ResponseEntity.ok(Map.of("msg", "文件合并失败"));
            }
        } else {
            // 未完成上传,返回未上传的分片信息
            try (RandomAccessFile accessFile = new RandomAccessFile(confFilePath, "r")) {
                StringBuilder stringBuilder = new StringBuilder();
                for (int i = 0; i < accessFile.length(); i++) {
                    stringBuilder.append(accessFile.readByte() == 0 ? "0" : "1");
                }
                return ResponseEntity.ok(Map.of("msg", "文件未上传完成", "chunks",
				                                                 stringBuilder.toString()));
            }
        }
    }
}
# 解决接口防抖
- 防抖(Debouncing)一是防用户手抖,二是防网络抖动
- 在Web系统中,表单提交如果不加控制,容易因为用户的误操作或网络延迟导致同一请求被发送多次
# 前端防抖
我们可以通过JavaScript中的setTimeout 和 clearTimeout 来实现防抖
let debounceTimeout;
const debounceDelay = 500; // 500ms 防抖

function handleSearch(event) {
    clearTimeout(debounceTimeout);
    debounceTimeout = setTimeout(function() {
        fetch(`/search?query=${event.target.value}`)
            .then(response => response.json())
            .then(data => console.log(data));
    }, debounceDelay);
}
# 基于Redis的防抖
- 在pom.xml文件中引入Redis相关依赖
<dependency>
    <groupId>org.springframework.boot</groupId>
    <artifactId>spring-boot-starter-data-redis</artifactId>
</dependency>
- 接下来就是配置Redis的连接
spring.redis.host=localhost
spring.redis.port=6379
spring.redis.password=your_password
- 创建一个服务类,用来实现防抖逻辑,检查每个请求的时间是否过于接近,避免出现重复请求的情况
@Service
public class DebounceService {

    @Autowired
    private StringRedisTemplate redisTemplate;

    private static final String DEBOUNCE_KEY = "debounce_key:"; // 这个key用于标识每个请求

    // 防抖时间,单位:秒
    private static final long DEBOUNCE_TIME = 2;

    public boolean isDebounced(String userId) {
        String key = DEBOUNCE_KEY + userId;

        // 获取上一次请求的时间戳
        String lastRequestTime = redisTemplate.opsForValue().get(key);
        long currentTime = System.currentTimeMillis();

        if (lastRequestTime != null) {
            // 如果距离上次请求时间小于防抖时间,认为是重复请求
            long elapsed = currentTime - Long.parseLong(lastRequestTime);
            if (elapsed < DEBOUNCE_TIME * 1000) {
                return true; // 需要防抖
            }
        }

        // 更新请求时间戳
        redisTemplate.opsForValue().set(key, String.valueOf(currentTime), DEBOUNCE_TIME, TimeUnit.SECONDS);
        return false;
    }
}
- 在控制器中通过上面的服务来实现接口请求评率的判断,从而实现接口的防抖操作
@RestController
public class SearchController {

    @Autowired
    private DebounceService debounceService;

    @GetMapping("/search")
    public String search(@RequestParam String query, @RequestParam String userId) {
        if (debounceService.isDebounced(userId)) {
            return "Please wait before making another request.";
        }

        // 执行搜索操作
        return "Searching for: " + query;
    }
}
# 基于线程池的防抖
- 在 Spring Boot 中通过 @Configuration 注解配置类来配置一个线程池操作
@Configuration
public class ThreadPoolConfig {

    @Bean
    public Executor taskExecutor() {
        return Executors.newSingleThreadExecutor();
    }
}
- 接下来,利用这个线程池来实现接口的防抖操作
@Service
public class DebounceService {

    @Async
    public void debounceTask(Runnable task, long delay) {
        try {
            Thread.sleep(delay);
            task.run();
        } catch (InterruptedException e) {
            Thread.currentThread().interrupt();
        }
    }
}
- 在Controller控制器中通过创建异步任务来对接口实现防抖逻辑的处理
@RestController
public class SearchController {

    @Autowired
    private DebounceService debounceService;

    @GetMapping("/search")
    public String search(@RequestParam String query) {
        Runnable task = () -> {
            // 执行搜索操作
            System.out.println("Searching for: " + query);
        };

        // 延迟1秒执行任务,模拟防抖效果
        debounceService.debounceTask(task, 1000);

        return "Request received. Please wait for search to complete.";
    }
}
# 接口的幂等性
对于相同的请求,无论请求多少次,都应该返回相同的结果。这意味着,如果请求已经处理完毕,那么重复请求应该返回相同的响应,而不应该产生额外的副作用。
# 幂等性的解决方案
- 唯一索引:可以避免脏数据的添加,当插入重复数据时数据库会抛异常,保证了数据的唯一性
- 乐观锁:这里的乐观锁指的是用乐观锁的原理去实现
-- 为数据字段增加一个version字段,当数据需要更新时,先去数据库里获取此时的version版本号
select version from tablename where xxx

-- 更新数据时首先和版本号作对比,如果不相等说明已经有其他的请求去更新数据了,提示更新失败
update tablename set count=count+1,version=version+1 where version=#{version}
- 悲观锁:乐观锁可以实现的用悲观锁也能实现,在获取数据时加锁,有多个重复请求时都无法进行操作
- 分布式锁:幂等的本质是分布式锁的问题,分布式锁正常可以通过redis或zookeeper实现
- token机制:核心思想是为每一次操作生成一个唯一性的token凭证。token机制的应用十分广泛
# token机制的实现
- 首先引入需要的依赖
<dependency>
    <groupId>org.springframework.boot</groupId>
    <artifactId>spring-boot-starter-data-redis</artifactId>
</dependency>
<dependency>
    <groupId>org.apache.commons</groupId>
    <artifactId>commons-lang3</artifactId>
    <version>3.4</version>
</dependency>
<dependency>
    <groupId>org.springframework.boot</groupId>
    <artifactId>spring-boot-starter-web</artifactId>
</dependency>
- 配置请求的方法体和枚举类
public class Response {
    private int status;
    private String msg;
    private Object data;
    //省略get、set、toString、无参有参构造方法
}
public enum ResponseCode {
    // 通用模块 1xxxx
    ILLEGAL_ARGUMENT(10000, "参数不合法"),
    REPETITIVE_OPERATION(10001, "请勿重复操作"),
    ;
    ResponseCode(Integer code, String msg) {
        this.code = code;
        this.msg = msg;
    }
    private Integer code;
    private String msg;
    public Integer getCode() {
        return code;
    }
    public void setCode(Integer code) {
        this.code = code;
    }
    public String getMsg() {
        return msg;
    }
    public void setMsg(String msg) {
        this.msg = msg;
    }
}
- 自定义异常以及配置全局异常类
public class ServiceException extends RuntimeException{
    private String code;
    private String msg;
    //省略get、set、toString以及构造方法
}
@ControllerAdvice
public class MyControllerAdvice {
    @ResponseBody
    @ExceptionHandler(ServiceException.class)
    public Response serviceExceptionHandler(ServiceException exception){
        Response response=new Response(Integer.valueOf(exception.getCode()),exception.getMsg(),null);
        return response;
    }
}
- 编写创建Token和验证Token的接口以及实现类
@Service
public interface TokenService {
    public Response createToken();
    public Response checkToken(HttpServletRequest request);
}
@Service
public class TokenServiceImpl implements TokenService {

    @Autowired
    private RedisTemplate redisTemplate;

    @Override
    public Response createToken() {
        //生成uuid当作token
        String token = UUID.randomUUID().toString().replaceAll("-","");
        //将生成的token存入redis中
        redisTemplate.opsForValue().set(token,token);
        //返回正确的结果信息
        Response response=new Response(0,token.toString(),null);
        return response;
    }

    @Override
    public Response checkToken(HttpServletRequest request) {
        //从请求头中获取token
        String token=request.getHeader("token");
        if (StringUtils.isBlank(token)){
            //如果请求头token为空就从参数中获取
            token=request.getParameter("token");
            //如果都为空抛出参数异常的错误
            if (StringUtils.isBlank(token)){
                throw new ServiceException(ResponseCode.ILLEGAL_ARGUMENT.getCode().toString(),ResponseCode.ILLEGAL_ARGUMENT.getMsg());
            }
        }
        //如果redis中不包含该token,说明token已经被删除了,抛出请求重复异常
        if (!redisTemplate.hasKey(token)){
            throw new ServiceException(ResponseCode.REPETITIVE_OPERATION.getCode().toString(),ResponseCode.REPETITIVE_OPERATION.getMsg());
        }
        //删除token
        Boolean del=redisTemplate.delete(token);
        //如果删除不成功(已经被其他请求删除),抛出请求重复异常
        if (!del){
            throw new ServiceException(ResponseCode.REPETITIVE_OPERATION.getCode().toString(),ResponseCode.REPETITIVE_OPERATION.getMsg());
        }
        return new Response(0,"校验成功",null);
    }
}
- 配置自定义注解以及接口拦截器
@Target({ElementType.METHOD})
@Retention(RetentionPolicy.RUNTIME)
public @interface ApiIdempotent {

}
public class ApiIdempotentInterceptor implements HandlerInterceptor {
    @Autowired
    private TokenService tokenService;

    @Override
    public boolean preHandle(HttpServletRequest request, HttpServletResponse response, Object handler) throws Exception {
        if (!(handler instanceof HandlerMethod)) {
            return true;
        }
        HandlerMethod handlerMethod= (HandlerMethod) handler;
        Method method=handlerMethod.getMethod();
        ApiIdempotent methodAnnotation=method.getAnnotation(ApiIdempotent.class);
        if (methodAnnotation != null){
            // 校验通过放行,校验不通过全局异常捕获后输出返回结果
            tokenService.checkToken(request);
        }
        return true;
    }

    @Override
    public void postHandle(HttpServletRequest request, HttpServletResponse response, Object handler, ModelAndView modelAndView) throws Exception {
    }

    @Override
    public void afterCompletion(HttpServletRequest request, HttpServletResponse response, Object handler, Exception ex) throws Exception {
    }
}
- 配置拦截器以及redis
@Configuration
public class WebConfig implements WebMvcConfigurer {
    @Override
    public void addInterceptors(InterceptorRegistry registry) {
        registry.addInterceptor(apiIdempotentInterceptor());
    }

    @Bean
    public ApiIdempotentInterceptor apiIdempotentInterceptor() {
        return new ApiIdempotentInterceptor();
    }
}
@Configuration
public class RedisConfig {
    //自定义的redistemplate
    @Bean(name = "redisTemplate")
    public RedisTemplate<String,Object> redisTemplate(RedisConnectionFactory factory){
        //创建一个RedisTemplate对象,为了方便返回key为string,value为Object
        RedisTemplate<String,Object> template = new RedisTemplate<>();
        template.setConnectionFactory(factory);
        //设置json序列化配置
        Jackson2JsonRedisSerializer jackson2JsonRedisSerializer=new
                Jackson2JsonRedisSerializer(Object.class);
        ObjectMapper objectMapper=new ObjectMapper();
        objectMapper.setVisibility(PropertyAccessor.ALL, JsonAutoDetect.Visibility.ANY);
        objectMapper.activateDefaultTyping(LaissezFaireSubTypeValidator.instance);
        //string的序列化
        StringRedisSerializer stringRedisSerializer=new StringRedisSerializer();
        //key采用string的序列化方式
        template.setKeySerializer(stringRedisSerializer);
        //value采用jackson的序列化方式
        template.setValueSerializer(jackson2JsonRedisSerializer);
        //hashkey采用string的序列化方式
        template.setHashKeySerializer(stringRedisSerializer);
        //hashvalue采用jackson的序列化方式
        template.setHashValueSerializer(jackson2JsonRedisSerializer);
        template.afterPropertiesSet();
        return template;
    }
}
- 最后是controller
@RestController
@RequestMapping("/token")
public class TokenController {
    @Autowired
    private TokenService tokenService;

    @GetMapping
    public Response token(){
        return tokenService.createToken();
    }

    @PostMapping("checktoken")
    public Response checktoken(HttpServletRequest request){
        return tokenService.checkToken(request);
    }
}
- 结果验证
# 首先通过token接口创建一个token出来,此时redis中也存在了该token
# 在jmeter中同时运行50个请求,我们可以观察到,只有第一个请求校验成功,后续的请求均提示请勿重复操作
# jsencrypt 加密后的信息在后端解密
- 前端代码
// npm install jsencrypt@3.0.0-rc.1
import JSEncrypt from 'jsencrypt/bin/jsencrypt.min'

// 密钥对生成 http://web.chacuo.net/netrsakeypair

const publicKey = 'MFwwDQYJKoZIhvcNAQEBBQADSwAwSAJBAKoR8mX0rGKLqzcWmOzbfj64K8ZIgOdH\n' +
  'nzkXSOVOZbFu/TJhZ7rFAN+eaGkl3C4buccQd/EjEsj9ir7ijT7h96MCAwEAAQ=='

const privateKey = 'MIIBVAIBADANBgkqhkiG9w0BAQEFAASCAT4wggE6AgEAAkEAqhHyZfSsYourNxaY\n' +
  '7Nt+PrgrxkiA50efORdI5U5lsW79MmFnusUA355oaSXcLhu5xxB38SMSyP2KvuKN\n' +
  'PuH3owIDAQABAkAfoiLyL+Z4lf4Myxk6xUDgLaWGximj20CUf+5BKKnlrK+Ed8gA\n' +
  'kM0HqoTt2UZwA5E2MzS4EI2gjfQhz5X28uqxAiEA3wNFxfrCZlSZHb0gn2zDpWow\n' +
  'cSxQAgiCstxGUoOqlW8CIQDDOerGKH5OmCJ4Z21v+F25WaHYPxCFMvwxpcw99Ecv\n' +
  'DQIgIdhDTIqD2jfYjPTY8Jj3EDGPbH2HHuffvflECt3Ek60CIQCFRlCkHpi7hthh\n' +
  'YhovyloRYsM+IS9h/0BzlEAuO0ktMQIgSPT3aFAgJYwKpqRYKlLDVcflZFCKY7u3\n' +
  'UP8iWi1Qw0Y='

// 加密
export function encrypt(txt) {
  const encryptor = new JSEncrypt()
  encryptor.setPublicKey(publicKey) // 设置公钥
  return encryptor.encrypt(txt) // 对数据进行加密
}

// 解密
export function decrypt(txt) {
  const encryptor = new JSEncrypt()
  encryptor.setPrivateKey(privateKey) // 设置私钥
  return encryptor.decrypt(txt) // 对数据进行解密
}
- 后端代码
private PrivateKey getPrivateKey(String privateKeyPEM) throws Exception {
	String privateKeyPEMFormat = privateKeyPEM.replace("-----BEGIN PRIVATE KEY-----", "")
			.replace("-----END PRIVATE KEY-----", "").replaceAll("\\s+", "");
	byte[] encoded = Base64.getDecoder().decode(privateKeyPEMFormat);
	PKCS8EncodedKeySpec keySpec = new PKCS8EncodedKeySpec(encoded);
	KeyFactory keyFactory = KeyFactory.getInstance("RSA");
	return keyFactory.generatePrivate(keySpec);
}

public String decrypt(String encryptedData, String privateKeyPEM) throws Exception {
	PrivateKey privateKey = getPrivateKey(privateKeyPEM);

	Cipher cipher = Cipher.getInstance("RSA");
	cipher.init(Cipher.DECRYPT_MODE, privateKey);
	byte[] decryptedBytes = cipher.doFinal(Base64.getDecoder().decode(encryptedData));
	return new String(decryptedBytes);
}
# 证书管理引擎 TrueLicense
License也就是版权许可证书,一般用于收费软件给付费用户提供的访问许可证明,使用方法 (opens new window)
- 生成密钥对,使用Keytool生成公私钥证书库
- 授权者保留私钥,使用私钥和使用日期生成证书license
- 公钥与生成的证书给使用者(放在验证的代码中使用),验证证书license是否在有效期内
# @Transactional + @Async
- @Async 方法中调用 @Transactional 方法可以保证数据完整性 ,因为 Spring 会正确地传播相同的上下文
- 但是,从 @Transactional 中调用 @Async 方法时,可能会遇到数据完整性问题